

So, let's talk Jack O Lanterns!!!
First, for a little History on Jack O Lanterns...
Quite obviously the Jack O Lantern is one of the most recognizable symbols of Halloween... but, how did they come to be? Why did people begin carving into this fruit? Well, on this magical night, people used to set Jack O Lanterns carved from turnips and gourds on their front porches and in their windows to welcome deceased loved ones and as protection from evil spirits. They used burning lumps of coal as a source of light, later replaced by candles.
As years passed, it was discovered that American native pumpkins were larger, easier to carve, and just all around made a better Jack O Lantern!
So, there you go! Jack O Lanterns will ward off those evil spirits!

So... Now we know why we make Jack O Lanterns... let's find out how to make the perfect Jack O Lantern!!!
First, you can purchase Jack O Lantern stencils and pumpkin carving kits at the supermarket. If you already have the tools and just need the stencils, a quick search online. Honestly, you can pretty much take any black and white picture you can find and turn it into a stencil, but there are several websites you can go to to find easy to use stencils. Here are some examples:
Disney Character Pumpkins
Pumpkin Masters
Kim's Free Pumpkin Patterns
Pumpkin Carving Patterns
Fabulous Living
DLTK Holidays
Rock and Roll Heaven
Now that you have your stencil picked out, make sure you have the proper tools for the job. The easiest way is to buy a kit with the following tools:
 These will be your three basic tools, the scoop/scraper, the large saw, and the small saw. You can also purchase sets that will include more tools such as pokers and drills, to make eye holes easy, and for poking holes through the pattern into the pumpkin flesh.
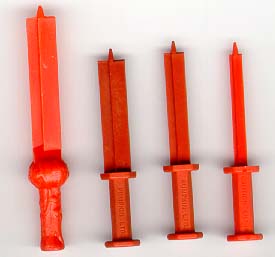
Now that you have your tools, it is time to prepare your pumpkin for carving:
1. Cut a lid for your Jack O Lantern
Use your large saw blade for this, or a kitchen knife, making sure to keep the pumpkin
steady to not cut yourself. Cut this lid into a cone shape so the lid will not fall down into your pumpkin. Not all pumpkins need a lid, you can cut a hole into the side or the back if you prefer to preserve the top of your pumpkin. The top of your pumpkin will be scorched if you are using a candle with a lid, but you can also cut a chimney into the top of your pumpkin that can reduce the scorching.
2. Remove the guts of the pumpkin
Use your scoop/scraper to help remove the guts and seeds from the inside of the pumpkin. Scrape behind the front of the pumpkin where you intend to carve. Ideally, you want this to be an inch thick, any thicker makes it too difficult to carve it, and any thinner causes it to shrivel and wither faster.
3. Transfer your pattern
Your pattern can be resized easily if you have a copier at home to fit your pumpkin, you obviously can't have a pattern bigger than your pumpkin surface, and you want it to be big enough. Cut the pattern down, closer to the actual image so you have less paper in the way, and then cut slits around the edges of the paper so it will lay more flat onto the surface of your pumpkin without bunching. You can fold it in some places to help it lay more flat also. Once you have the pattern placed just right onto your pumpkin, use scotch tape to hold it into place. Now, if you have the pokers, this is when they come in. If not, I've found it easiest to use a regular push pin. Poke holes along the patern. Make sure you poke enough holes along ALL the edges of ALL the lines in the pattern, so that it is identifiable once you've removed the pattern. I suggest no further than 1/8 inch apart. This is a task, but TRUST me, if you don't do this, you might as well forget being able to carve your pattern. The closer the holes are together, the easier it is to follow your pattern, plus it makes it easier to cut, just like it's easier to tear perforated paper. Once you have all the holes poked through, remove the pattern. If you are still having a hard time identifying what's what with your pattern, I would suggest using a marker or a pen to connect the dots and draw the image onto the pumpkin that way.
Now, you're ready to start carving!
Keep your pattern close so you can still get a visual of what exactly is what. Like I said before, if you need, you can connect the dots with a marker, or you can rub flour over the holes and this will make them stand out.... If you use the marker, try to do it further inside the areas that will be cut out, so it doesn't show on the final result.
Hold your saw like a pencil and SAW. Make sure you are cutting away the areas that are supposed to be gone, areas cannot float, so make sure the areas that couldn't be supported by the pumpkin are being cut out and you're not attempting to leave those areas in tact unattached to the pumpkin. Saw slowly and gently. TAKE YOUR TIME. When you get rushed, you're more likely to cut away into pieces that aren't meant to be cut, or you may even cut yourself. I would suggest cutting little pieces at a time, if you have large areas that have delicate edges break it up into more than one section, cutting the largest area first, and saving the edges for last.
Don't try to slice, SAW... and, unlike the cone shape you were striving for with the lid, try to cut STRAIGHT through the pumpkin for optimal lighting. Keep the pumpkin at a 90 degree angle from your body and hold the saw straight into the pumpkin. Remove the pieces with your fingers, not with your saw, this can break your saw or you could accidentally cut your pumpkin or yourself. If you are having trouble removing it, try cutting it into smaller subsections.
Start carving in the center of the pumpkin and work your way out, as the pumpkin gets weaker and weaker as you carve. Also, cut smaller sections first, because like I said, the pumpkin gets weaker and weaker as you carve.
If you happen to mess up and cut something too thin, and it has either fallen off or there is a possibility it will fall off, simply use toothpicks to either repair it or to make it stronger.
So, now you've carved your pumpkin.... but how do you keep it from shriveling up so quickly??? Don't you hate when you've spent HOURS working on a Jack O Lantern only to have it shrivel up in just a few days????? Well, here are some tips for preserving your pumpkin, and even deshriveling your jack o lantern....
After you carve your pumpkin, take it into the bathroom. Fill the tub with cool water. Place the pumpkin into the tub, carved side down and let it float around in the tub for a few hours. It will be nice and firm. You can put a tiny bit of bleach in the water to prevent your pumpkin from prematurely molding. Make sure to towel dry your pumpkin when you remove it from the tub to help prevent molding. Then take some vaseline and rub it onto all the sawed edges to keep the moisture in. I would also suggest at least the inside of the front of your pumpkin. If your pumpkin starts shriveling, just repeat this process, you can even leave it overnight... but leave it at least an hour is necessary to deshrivel it.
Now you have an awesome Jack O Lantern!!! If you don't want to use a pattern, you could always set it on its side and use the stem for a nose, carving a face around it.
Take lots of pictures! There is even a contest on College Humor's website you can enter now that you're a pro at pumpkin carving... you should enter it, it's a shot at a cool $100... that you could share with me!!!
Pimp Your Pumpkin - The College Humor contest
Soon you'll be making these left and right:

Seriously, good luck with that contest... Share the wealth!!! Happy Halloween everyone!!!

Haaaa!! I love the MJ pumpkin...I know that's from his mug shot, which makes it all the more priceless...hahahaa!
ReplyDelete