
YOU SUCK....
In all honesty, McDonalds has been one of my favorite fast food places since my childhood... With the exception of Jack in the Box (is it just me or is that a weird name for a restaurant?). That being said, I've always felt that McDonalds has the best french fries, their coke has the very best syrup to carbonation ratio, so perfect that I literally take a sip and I think "this is how Coca Cola was formulated to taste, this is what they had in mind" it's like it was developed especially for McDonalds.
But... McDonalds is probably the least consistent of any fast food chain out there. The fries are completely different depending on the location and even each shift within the same location.. It is ridiculous. McDonalds fries come in the following varieties: perfect, soggy, cold, double cooked, burnt, undercooked, salty, or no salt. How is this even possible? Don't the fryers have automatic settings that you merely drop the fries and push a button, wait until a timer goes off and then lift them out of the grease? And that salt, come on.... is there not a specs chart somewhere in that joint?? Jesus, half the time I have to rake the salt off each fry or throw them away.
All I can say is 90% of the time, if I go through a McDonalds drive thru... no matter the location, time, whatever... SOMETHING is wrong. Whether it be no toy in my child's Happy Meal (What a jip is that? Do you realize what I now have to listen to because YOU forgot the stupid toy?), my husband having no fries the last TWO times he got home (Again, do you realize what I now have to listen to?), mustard when I said no mustard, pickles when I said no pickles... and do I always have to ask for a straw? Come on now....
Monday, October 19, 2009
Sunday, October 18, 2009
Wednesday, October 14, 2009
Pumpkin Carving
Well, it's that time of year again: pumpkin carving time. It can be a lot of fun to carve the perfect jack o lantern... it can also be a lot of work. However, with the right pattern and the correct tools, it can be made a lot simpler and the results are a lot more impressive:

So, let's talk Jack O Lanterns!!!
First, for a little History on Jack O Lanterns...
Quite obviously the Jack O Lantern is one of the most recognizable symbols of Halloween... but, how did they come to be? Why did people begin carving into this fruit? Well, on this magical night, people used to set Jack O Lanterns carved from turnips and gourds on their front porches and in their windows to welcome deceased loved ones and as protection from evil spirits. They used burning lumps of coal as a source of light, later replaced by candles.
As years passed, it was discovered that American native pumpkins were larger, easier to carve, and just all around made a better Jack O Lantern!
So, there you go! Jack O Lanterns will ward off those evil spirits!

So... Now we know why we make Jack O Lanterns... let's find out how to make the perfect Jack O Lantern!!!
First, you can purchase Jack O Lantern stencils and pumpkin carving kits at the supermarket. If you already have the tools and just need the stencils, a quick search online. Honestly, you can pretty much take any black and white picture you can find and turn it into a stencil, but there are several websites you can go to to find easy to use stencils. Here are some examples:
Disney Character Pumpkins
Pumpkin Masters
Kim's Free Pumpkin Patterns
Pumpkin Carving Patterns
Fabulous Living
DLTK Holidays
Rock and Roll Heaven
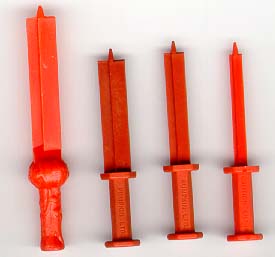
Now that you have your stencil picked out, make sure you have the proper tools for the job. The easiest way is to buy a kit with the following tools: These will be your three basic tools, the scoop/scraper, the large saw, and the small saw. You can also purchase sets that will include more tools such as pokers and drills, to make eye holes easy, and for poking holes through the pattern into the pumpkin flesh.
Now that you have your tools, it is time to prepare your pumpkin for carving:
1. Cut a lid for your Jack O Lantern
Use your large saw blade for this, or a kitchen knife, making sure to keep the pumpkin
steady to not cut yourself. Cut this lid into a cone shape so the lid will not fall down into your pumpkin. Not all pumpkins need a lid, you can cut a hole into the side or the back if you prefer to preserve the top of your pumpkin. The top of your pumpkin will be scorched if you are using a candle with a lid, but you can also cut a chimney into the top of your pumpkin that can reduce the scorching.
2. Remove the guts of the pumpkin
Use your scoop/scraper to help remove the guts and seeds from the inside of the pumpkin. Scrape behind the front of the pumpkin where you intend to carve. Ideally, you want this to be an inch thick, any thicker makes it too difficult to carve it, and any thinner causes it to shrivel and wither faster.
3. Transfer your pattern
Your pattern can be resized easily if you have a copier at home to fit your pumpkin, you obviously can't have a pattern bigger than your pumpkin surface, and you want it to be big enough. Cut the pattern down, closer to the actual image so you have less paper in the way, and then cut slits around the edges of the paper so it will lay more flat onto the surface of your pumpkin without bunching. You can fold it in some places to help it lay more flat also. Once you have the pattern placed just right onto your pumpkin, use scotch tape to hold it into place. Now, if you have the pokers, this is when they come in. If not, I've found it easiest to use a regular push pin. Poke holes along the patern. Make sure you poke enough holes along ALL the edges of ALL the lines in the pattern, so that it is identifiable once you've removed the pattern. I suggest no further than 1/8 inch apart. This is a task, but TRUST me, if you don't do this, you might as well forget being able to carve your pattern. The closer the holes are together, the easier it is to follow your pattern, plus it makes it easier to cut, just like it's easier to tear perforated paper. Once you have all the holes poked through, remove the pattern. If you are still having a hard time identifying what's what with your pattern, I would suggest using a marker or a pen to connect the dots and draw the image onto the pumpkin that way.
Now, you're ready to start carving!
Keep your pattern close so you can still get a visual of what exactly is what. Like I said before, if you need, you can connect the dots with a marker, or you can rub flour over the holes and this will make them stand out.... If you use the marker, try to do it further inside the areas that will be cut out, so it doesn't show on the final result.
Hold your saw like a pencil and SAW. Make sure you are cutting away the areas that are supposed to be gone, areas cannot float, so make sure the areas that couldn't be supported by the pumpkin are being cut out and you're not attempting to leave those areas in tact unattached to the pumpkin. Saw slowly and gently. TAKE YOUR TIME. When you get rushed, you're more likely to cut away into pieces that aren't meant to be cut, or you may even cut yourself. I would suggest cutting little pieces at a time, if you have large areas that have delicate edges break it up into more than one section, cutting the largest area first, and saving the edges for last.
Don't try to slice, SAW... and, unlike the cone shape you were striving for with the lid, try to cut STRAIGHT through the pumpkin for optimal lighting. Keep the pumpkin at a 90 degree angle from your body and hold the saw straight into the pumpkin. Remove the pieces with your fingers, not with your saw, this can break your saw or you could accidentally cut your pumpkin or yourself. If you are having trouble removing it, try cutting it into smaller subsections.
Start carving in the center of the pumpkin and work your way out, as the pumpkin gets weaker and weaker as you carve. Also, cut smaller sections first, because like I said, the pumpkin gets weaker and weaker as you carve.
If you happen to mess up and cut something too thin, and it has either fallen off or there is a possibility it will fall off, simply use toothpicks to either repair it or to make it stronger.
So, now you've carved your pumpkin.... but how do you keep it from shriveling up so quickly??? Don't you hate when you've spent HOURS working on a Jack O Lantern only to have it shrivel up in just a few days????? Well, here are some tips for preserving your pumpkin, and even deshriveling your jack o lantern....
After you carve your pumpkin, take it into the bathroom. Fill the tub with cool water. Place the pumpkin into the tub, carved side down and let it float around in the tub for a few hours. It will be nice and firm. You can put a tiny bit of bleach in the water to prevent your pumpkin from prematurely molding. Make sure to towel dry your pumpkin when you remove it from the tub to help prevent molding. Then take some vaseline and rub it onto all the sawed edges to keep the moisture in. I would also suggest at least the inside of the front of your pumpkin. If your pumpkin starts shriveling, just repeat this process, you can even leave it overnight... but leave it at least an hour is necessary to deshrivel it.
Now you have an awesome Jack O Lantern!!! If you don't want to use a pattern, you could always set it on its side and use the stem for a nose, carving a face around it.
Take lots of pictures! There is even a contest on College Humor's website you can enter now that you're a pro at pumpkin carving... you should enter it, it's a shot at a cool $100... that you could share with me!!!
Pimp Your Pumpkin - The College Humor contest
Soon you'll be making these left and right:

Seriously, good luck with that contest... Share the wealth!!! Happy Halloween everyone!!!
So, let's talk Jack O Lanterns!!!
First, for a little History on Jack O Lanterns...
Quite obviously the Jack O Lantern is one of the most recognizable symbols of Halloween... but, how did they come to be? Why did people begin carving into this fruit? Well, on this magical night, people used to set Jack O Lanterns carved from turnips and gourds on their front porches and in their windows to welcome deceased loved ones and as protection from evil spirits. They used burning lumps of coal as a source of light, later replaced by candles.
As years passed, it was discovered that American native pumpkins were larger, easier to carve, and just all around made a better Jack O Lantern!
So, there you go! Jack O Lanterns will ward off those evil spirits!
So... Now we know why we make Jack O Lanterns... let's find out how to make the perfect Jack O Lantern!!!
First, you can purchase Jack O Lantern stencils and pumpkin carving kits at the supermarket. If you already have the tools and just need the stencils, a quick search online. Honestly, you can pretty much take any black and white picture you can find and turn it into a stencil, but there are several websites you can go to to find easy to use stencils. Here are some examples:
Disney Character Pumpkins
Pumpkin Masters
Kim's Free Pumpkin Patterns
Pumpkin Carving Patterns
Fabulous Living
DLTK Holidays
Rock and Roll Heaven
Now that you have your stencil picked out, make sure you have the proper tools for the job. The easiest way is to buy a kit with the following tools:
These will be your three basic tools, the scoop/scraper, the large saw, and the small saw. You can also purchase sets that will include more tools such as pokers and drills, to make eye holes easy, and for poking holes through the pattern into the pumpkin flesh.Now that you have your tools, it is time to prepare your pumpkin for carving:
1. Cut a lid for your Jack O Lantern
Use your large saw blade for this, or a kitchen knife, making sure to keep the pumpkin
steady to not cut yourself. Cut this lid into a cone shape so the lid will not fall down into your pumpkin. Not all pumpkins need a lid, you can cut a hole into the side or the back if you prefer to preserve the top of your pumpkin. The top of your pumpkin will be scorched if you are using a candle with a lid, but you can also cut a chimney into the top of your pumpkin that can reduce the scorching.
2. Remove the guts of the pumpkin
Use your scoop/scraper to help remove the guts and seeds from the inside of the pumpkin. Scrape behind the front of the pumpkin where you intend to carve. Ideally, you want this to be an inch thick, any thicker makes it too difficult to carve it, and any thinner causes it to shrivel and wither faster.
3. Transfer your pattern
Your pattern can be resized easily if you have a copier at home to fit your pumpkin, you obviously can't have a pattern bigger than your pumpkin surface, and you want it to be big enough. Cut the pattern down, closer to the actual image so you have less paper in the way, and then cut slits around the edges of the paper so it will lay more flat onto the surface of your pumpkin without bunching. You can fold it in some places to help it lay more flat also. Once you have the pattern placed just right onto your pumpkin, use scotch tape to hold it into place. Now, if you have the pokers, this is when they come in. If not, I've found it easiest to use a regular push pin. Poke holes along the patern. Make sure you poke enough holes along ALL the edges of ALL the lines in the pattern, so that it is identifiable once you've removed the pattern. I suggest no further than 1/8 inch apart. This is a task, but TRUST me, if you don't do this, you might as well forget being able to carve your pattern. The closer the holes are together, the easier it is to follow your pattern, plus it makes it easier to cut, just like it's easier to tear perforated paper. Once you have all the holes poked through, remove the pattern. If you are still having a hard time identifying what's what with your pattern, I would suggest using a marker or a pen to connect the dots and draw the image onto the pumpkin that way.
Now, you're ready to start carving!
Keep your pattern close so you can still get a visual of what exactly is what. Like I said before, if you need, you can connect the dots with a marker, or you can rub flour over the holes and this will make them stand out.... If you use the marker, try to do it further inside the areas that will be cut out, so it doesn't show on the final result.
Hold your saw like a pencil and SAW. Make sure you are cutting away the areas that are supposed to be gone, areas cannot float, so make sure the areas that couldn't be supported by the pumpkin are being cut out and you're not attempting to leave those areas in tact unattached to the pumpkin. Saw slowly and gently. TAKE YOUR TIME. When you get rushed, you're more likely to cut away into pieces that aren't meant to be cut, or you may even cut yourself. I would suggest cutting little pieces at a time, if you have large areas that have delicate edges break it up into more than one section, cutting the largest area first, and saving the edges for last.
Don't try to slice, SAW... and, unlike the cone shape you were striving for with the lid, try to cut STRAIGHT through the pumpkin for optimal lighting. Keep the pumpkin at a 90 degree angle from your body and hold the saw straight into the pumpkin. Remove the pieces with your fingers, not with your saw, this can break your saw or you could accidentally cut your pumpkin or yourself. If you are having trouble removing it, try cutting it into smaller subsections.
Start carving in the center of the pumpkin and work your way out, as the pumpkin gets weaker and weaker as you carve. Also, cut smaller sections first, because like I said, the pumpkin gets weaker and weaker as you carve.
If you happen to mess up and cut something too thin, and it has either fallen off or there is a possibility it will fall off, simply use toothpicks to either repair it or to make it stronger.
So, now you've carved your pumpkin.... but how do you keep it from shriveling up so quickly??? Don't you hate when you've spent HOURS working on a Jack O Lantern only to have it shrivel up in just a few days????? Well, here are some tips for preserving your pumpkin, and even deshriveling your jack o lantern....
After you carve your pumpkin, take it into the bathroom. Fill the tub with cool water. Place the pumpkin into the tub, carved side down and let it float around in the tub for a few hours. It will be nice and firm. You can put a tiny bit of bleach in the water to prevent your pumpkin from prematurely molding. Make sure to towel dry your pumpkin when you remove it from the tub to help prevent molding. Then take some vaseline and rub it onto all the sawed edges to keep the moisture in. I would also suggest at least the inside of the front of your pumpkin. If your pumpkin starts shriveling, just repeat this process, you can even leave it overnight... but leave it at least an hour is necessary to deshrivel it.
Now you have an awesome Jack O Lantern!!! If you don't want to use a pattern, you could always set it on its side and use the stem for a nose, carving a face around it.
Take lots of pictures! There is even a contest on College Humor's website you can enter now that you're a pro at pumpkin carving... you should enter it, it's a shot at a cool $100... that you could share with me!!!
Pimp Your Pumpkin - The College Humor contest
Soon you'll be making these left and right:
Seriously, good luck with that contest... Share the wealth!!! Happy Halloween everyone!!!
Tuesday, October 13, 2009
Scraping the Bottom of the Reality Television Barrell...
Now, anyone that knows me well.... no, scratch that.... Anyone that knows me at all knows I am a fan of reality television. I love the fights, I love the fact that these people are willing to make a living out of making fools of themselves for my entertainment. Now, not only has the "Of Love" series gotten completely out of hand, but, some of the people on these shows have gone completely overboard with the attempt to be on television.
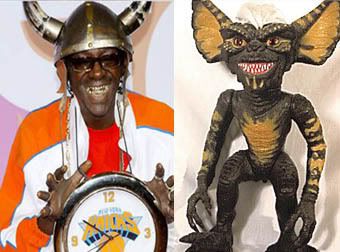
For instance... I used to watch "Flavor of Love" and just LAUGH... First of all, Flavor Flav is not an attractive man... He's NOT. Some would even say he resembles a particular gremlin. So, to think that 20 20-somethings want to actually pursue him without some type of face time time on a popular tv show is preposterous.... and multiply that by 3 and it's even more unlikely.
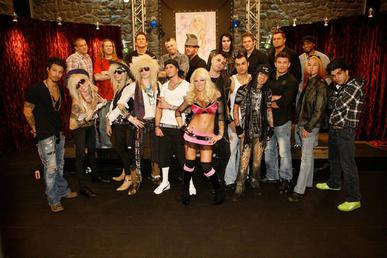
After the start of this "Of Love" craze, we went on to see such classics as "Rock of Love" seasons 1&2, "I Love New York" seasons 1&2, "Daisy of Love", "A Shot at Love" seasons 1,2,AND3, "Real Chance of Love" seasons1&2, and countless other spin offs of spin offs... I, personally am waiting for Andy Dick to come out with his dating show titled "Flavor of Dick" or "For the love of Dick"... but... I digress...
So, after their initial appearances on these so called dating shows, many of these "stars" have gone on to other reality shows, like "I Love Money" or their own dating shows. Dave Amerman, aka "12 pack", is a perfect example of a reality television "star" that has really tried to get his air time. Not only has Mr. Pack participated in the first season of "I Love New York", the first season of "I Love Money" (while sweeping Heather off her feet), "Daisy of Love" (with Heather's arch enemy), and, then, yesterday I was sitting with Logan's uncle, who LOVES watching all of the daytime judges: Mathis, Pirro, People's Court... Well, as I sit watching Judge Pirro, who walks in but Mr. Dave Amerman, suing HIS BROTHER..... SERIOUSLY? And, I have been looking all over the internet for a video of his appearance, because it was so obviously staged that it was silly. They literally sat and discussed what type of women each of them are interested in and pizza and beer.... It was ridiculous... What's next, is he going to be brought on Maury for a paternity test? Maybe he knocked Heather or Daisy up... hopefully he didn't go near New York's baby making parts with oven mitts on....
So, as I was searching for video of his appearance on the show, I came across some other interesting appearances by other reality television stars on Judge Pirro:
Joey from The Real World:

Ron Jeremy from.... uh.... and "The Surreal Life":
Really watch this for interesting information you may not have known about Ron...
"Taylor Made" and "It" from "I Love New York":
Wow...
Two more points I have: Don't Google Ron Jeremy videos without first preparing yourself or setting the SafeSearch, and really? A teacher? A special ed teacher? That's frightening....
For instance... I used to watch "Flavor of Love" and just LAUGH... First of all, Flavor Flav is not an attractive man... He's NOT. Some would even say he resembles a particular gremlin. So, to think that 20 20-somethings want to actually pursue him without some type of face time time on a popular tv show is preposterous.... and multiply that by 3 and it's even more unlikely.
After the start of this "Of Love" craze, we went on to see such classics as "Rock of Love" seasons 1&2, "I Love New York" seasons 1&2, "Daisy of Love", "A Shot at Love" seasons 1,2,AND3, "Real Chance of Love" seasons1&2, and countless other spin offs of spin offs... I, personally am waiting for Andy Dick to come out with his dating show titled "Flavor of Dick" or "For the love of Dick"... but... I digress...
So, after their initial appearances on these so called dating shows, many of these "stars" have gone on to other reality shows, like "I Love Money" or their own dating shows. Dave Amerman, aka "12 pack", is a perfect example of a reality television "star" that has really tried to get his air time. Not only has Mr. Pack participated in the first season of "I Love New York", the first season of "I Love Money" (while sweeping Heather off her feet), "Daisy of Love" (with Heather's arch enemy), and, then, yesterday I was sitting with Logan's uncle, who LOVES watching all of the daytime judges: Mathis, Pirro, People's Court... Well, as I sit watching Judge Pirro, who walks in but Mr. Dave Amerman, suing HIS BROTHER..... SERIOUSLY? And, I have been looking all over the internet for a video of his appearance, because it was so obviously staged that it was silly. They literally sat and discussed what type of women each of them are interested in and pizza and beer.... It was ridiculous... What's next, is he going to be brought on Maury for a paternity test? Maybe he knocked Heather or Daisy up... hopefully he didn't go near New York's baby making parts with oven mitts on....
So, as I was searching for video of his appearance on the show, I came across some other interesting appearances by other reality television stars on Judge Pirro:
Joey from The Real World:
Ron Jeremy from.... uh.... and "The Surreal Life":
Really watch this for interesting information you may not have known about Ron...
"Taylor Made" and "It" from "I Love New York":
Wow...
Two more points I have: Don't Google Ron Jeremy videos without first preparing yourself or setting the SafeSearch, and really? A teacher? A special ed teacher? That's frightening....
Monday, October 12, 2009
The Breastfeeding Doll...
Dear Spanish Toy Makers,
THIS is disturbing and creepy. What on earth were you thinking when you developed this? Now, personally, I am an advocate of breastfeeding; I breastfed my baby, and I will breastfeed my future children. Breastfeeding is natural... not when it comes to "playing house".
Seriously.... just watch the demo:
What do you think???
Story of Bugs... Lots and Lots of Bugs....
I've decided that since I've made the move to London [Kentucky], I have had close encounters with more bugs than ever before. And, it's not just the number of bugs, but the TYPES of bugs that disturb me... FOR EXAMPLE:
I'm sure some, or maybe even many of you may know what THIS IS:
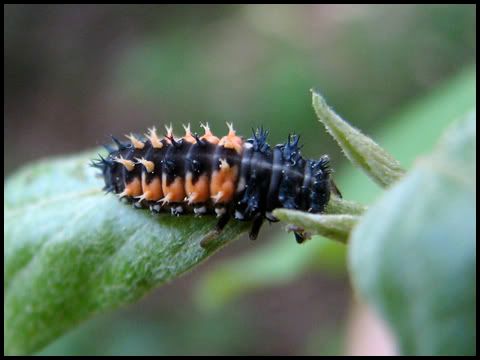
Well, in case you are not familiar with this particular bug... it is a Ladybug. Yes. A Ladybug. It is in fact, a Ladybug larvae. We had many close encounters with this bug crawling around on our back deck, and warned Ava sternly not to touch them, as they were quite scary looking to us, and we'd never seen anything like them before. I just happened to be browsing around on Ebaum's World one day and saw a link titled "Strange life cycle of the Ladybug", and clicked on it out of curiosity. I was shocked to see this bug I'd been scared silly of for weeks was in fact a baby Ladybug... It goes from the appearance pictured above to THIS:

Which, by the way, we just today found NUMEROUS Ladybug Pupa as this stage of the Ladybug is called, attached to the deck. Soon after, they become the Ladybugs we're all familiar with:

Now, is that nuts, or what?
I'm sure some, or maybe even many of you may know what THIS IS:
Well, in case you are not familiar with this particular bug... it is a Ladybug. Yes. A Ladybug. It is in fact, a Ladybug larvae. We had many close encounters with this bug crawling around on our back deck, and warned Ava sternly not to touch them, as they were quite scary looking to us, and we'd never seen anything like them before. I just happened to be browsing around on Ebaum's World one day and saw a link titled "Strange life cycle of the Ladybug", and clicked on it out of curiosity. I was shocked to see this bug I'd been scared silly of for weeks was in fact a baby Ladybug... It goes from the appearance pictured above to THIS:
Which, by the way, we just today found NUMEROUS Ladybug Pupa as this stage of the Ladybug is called, attached to the deck. Soon after, they become the Ladybugs we're all familiar with:
Now, is that nuts, or what?
Subscribe to:
Comments (Atom)
